
The most authentic version of yourself isn’t found by practicing a “cheese” in the mirror for hours. Many students feel a wave of anxiety when the camera lens points their way, worrying about messy hair or that dreaded, stiff posture that makes them look like a mannequin. If you’ve ever wondered how to look good in school photos without feeling like a total stranger to yourself, you aren’t alone. It’s a common struggle that even the most confident students face every year.
At Festival City Photography, we have spent decades capturing the spirit of Adelaide students, and we know that a great portrait is a partnership between you and the person behind the lens. In this ultimate 2026 guide, we’re sharing the professional secrets used by experts to help you master your school portraits. You’ll discover how to achieve a natural, confident smile, organise your grooming to meet school rules, and use simple posing techniques that eliminate stiffness. From managing lighting anxiety to ensuring your uniform looks sharp, we’ve got you covered for a photo your parents will actually want to display on the mantelpiece.
Key Takeaways
- Learn why your preparation should start two days before the camera clicks, focusing on rest to ensure bright and energetic eyes.
- Master the Aussie school dress code by choosing the right layers and colours to make your uniform look sharp and polished.
- Discover the “chin out and down” technique and other professional posing secrets for how to look good in school photos without feeling stiff.
- Move beyond the forced “cheese” expression with the tongue-behind-teeth trick to achieve a natural and relaxed smile every time.
- Understand how professional lighting and high-quality lenses turn a simple portrait into a lasting memory that parents will be proud to display.
Pre-Photo Day Prep: Setting the Scene for Success
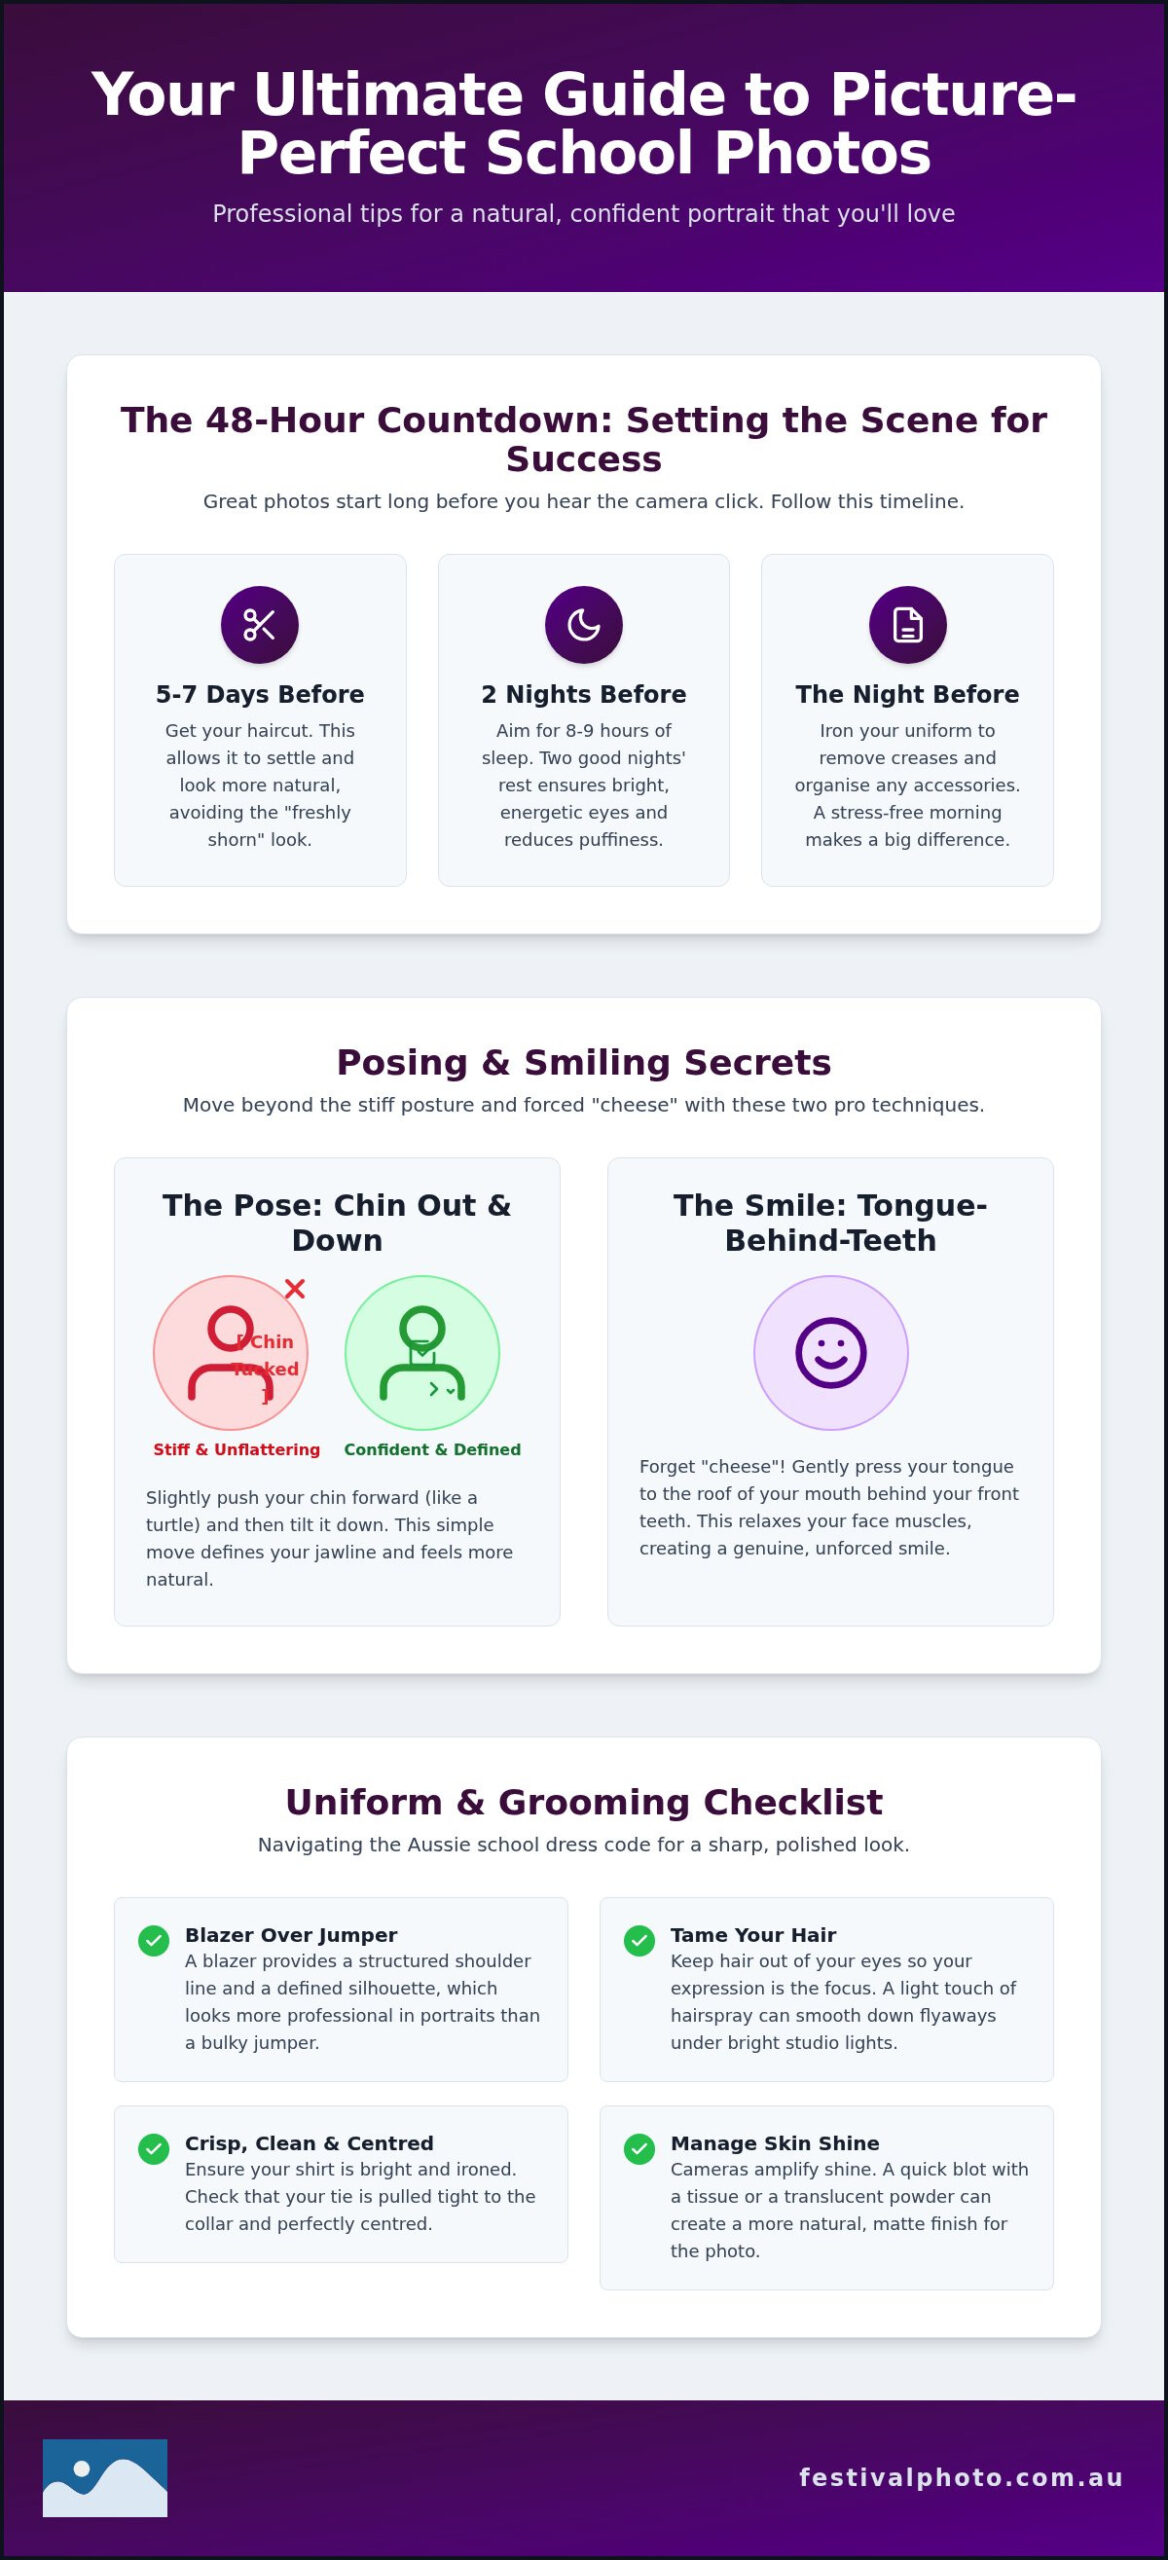
Preparation doesn’t start in the school hallway; it begins 48 hours before the shutter clicks. If you’re wondering how to look good in school photos, the secret lies in the biological lead-up. Your skin and eyes reflect your physical state, so prioritising rest is essential. Aim for at least eight to nine hours of sleep two nights in a row to eliminate “tired eyes” and puffiness. This recovery time allows your complexion to settle and ensures you look alert and energetic when you step in front of the lens.
Hydration plays a massive role in achieving a natural glow. Instead of reaching for heavy skincare products or sheet masks the night before, focus on drinking plenty of water in the days leading up to the shoot. This plumps the skin from within. Similarly, avoid getting a haircut the day before your session. Hair often looks too “freshly shorn” and stiff immediately after a trim. Booking your appointment five to seven days prior allows your hair to grow into a more natural, relaxed shape that frames your face better. A foundational understanding portrait photography suggests that while lighting is vital, the condition of the subject’s skin and hair provides the best canvas for a high-quality result.
The Night Before Checklist
Logistics can make or break your morning. Take ten minutes to iron your school blazer or shirt; creases catch the professional studio lights and create distracting shadows that even the best editing can’t always fix. Check for stray threads or missing buttons that might have gone unnoticed during a busy term. For kindy students, ensure hair accessories are organised and match the school colours perfectly. Year 12 students should double-check that their senior jumper or tie is clean and ready. This is a crucial step in learning how to look good in school photos because it removes the stress of a last-minute scramble.
Morning of the Shoot
A healthy, protein-rich breakfast keeps your energy levels steady and your focus sharp, which is necessary for following the photographer’s cues. Before leaving home, perform a final mirror check to ensure your collar is aligned and no stray hairs are out of place. It’s also vital for parents to stay calm. Children often mirror the anxiety of their parents, so keeping the mood light and encouraging will lead to a much more genuine expression. Whether it’s a first kindy portrait or a final graduation shot, a relaxed student always produces a better image than a stressed one.
Uniform and Grooming: Navigating the Aussie School Dress Code
Australian school dress codes are famously strict, which means your personal style has to shine through within specific boundaries. When considering how to look good in school photos, your uniform is the most important element. Ensure your school colours pop by making sure the fabric is clean and lint-free. Navy, bottle green, and maroon are common in Adelaide schools; these rich tones look best when the garment is well-maintained. If your uniform has a white shirt, ensure it is bright and crisp, as yellowing or stains are amplified by professional studio lights.
The “Blazer vs. Jumper” debate is a classic dilemma for many students. While a woollen jumper is comfortable, it can often appear bulky or lose its shape in a portrait. A blazer provides a structured shoulder line and a defined silhouette, which generally results in a more professional appearance. If you are wearing a tie, check that it is pulled tight to the collar and centred. These small adjustments are just as important as the posing tips for photos you might practice at home.
Grooming must align with your school’s specific policies to avoid being pulled out of the queue for a “uniform check.” Keep jewellery to the basics allowed, such as small studs or a watch. Ensure school badges are pinned straight on the lapel. If you want to ensure your final image is high-quality, choosing professional school portraits ensures that even the smallest details of your uniform are captured with technical precision and care.
Hair Styling for School Photos
The primary goal of hair styling is to ensure your face remains the focal point. Keep hair out of your eyes to let your expression shine. For those with long hair, consider whether you want it over your shoulders or tucked behind; consistency is key for a tidy look. Flyaways can be a nuisance under bright lights, so a light application of hairspray or a tiny amount of water can help smooth down those stubborn strands. Short hair should be neatly brushed, paying close attention to the neckline and around the ears.
Skin and Subtle Makeup
Professional cameras and lighting are designed to capture detail, which includes skin texture. Managing shine is the biggest challenge for many students. Using blotting paper or a light dusting of translucent powder provides a matte finish that looks excellent on camera. Senior students often opt for a “no-makeup” look, focusing on neutral tones that enhance features without appearing heavy. If an unexpected blemish appears on the morning of the shoot, don’t panic. Professional lighting is often quite forgiving, and the focus remains on your confident smile.
The Art of the Pose: Finding Your Best Angles
Posture acts as the invisible framework of every successful portrait. If you want to know how to look good in school photos, you must move beyond simply standing still. A common mistake is pulling the shoulders too far back, which creates a rigid, uncomfortable appearance. Instead, imagine a string pulling the crown of your head toward the ceiling. This naturally lengthens the neck and settles the shoulders into a relaxed but professional position. For senior students in Year 12, this subtle shift communicates confidence and maturity, while for primary school students, it helps them stay focused and still for the camera lens.
You might have heard of the “turtle” technique, but without professional context, it often looks forced or awkward. The goal is to define the jawline by pushing your chin slightly toward the camera lens and then dipping it down just a fraction. This creates a clear separation between your face and your neck, preventing the “double chin” effect that often occurs when a student is nervous and pulls their head back. It is a technical trick used in professional studios to create a more flattering silhouette that looks natural rather than staged.
Sitting vs. Standing Poses
How you distribute your weight significantly impacts the final image. When sitting, avoid leaning against the back of the chair, as this leads to slouching and a loss of height. Sit on the front edge and keep your hands resting naturally on your lap. If you’re standing, perhaps for a sports team photo or a graduation portrait, shift your weight to your back leg. This creates a slight angle in the body that is far more dynamic than standing square to the camera. Hand placement is equally vital; keep fingers relaxed and avoid clenching your fists, which can signal tension to the viewer.
The Sibling Photo Dynamic
Capturing the connection between family members requires a different approach. When taking sibling school photos, we focus on coordinating expressions and balancing height. If there is a large age gap between a Kindy student and an older sibling, the photographer will often use seating to ensure everyone is on a similar level. The key is to keep the interaction natural. A shared laugh often produces a more memorable result than a perfectly symmetrical pose, especially when trying to show the unique bond of an Adelaide family in a professional setting.
Mastering the Smile: Beyond the ‘Say Cheese’ Trap
Forcing the word “cheese” is the quickest way to end up with a portrait that looks strained. This vocalisation stretches the mouth horizontally, tensing the jaw and creating a smile that rarely reaches the eyes. If you want to know how to look good in school photos, you need to find a way to relax the facial muscles rather than activating them with force. A professional-looking smile is about ease, not effort.
The “Tongue Behind Teeth” trick is a favourite among Adelaide portrait experts. By gently resting the tip of your tongue against the roof of your mouth, just behind your front teeth, you naturally prevent your smile from becoming too wide or gummy. This technique relaxes the lips and creates a soft, approachable look that stays consistent even if you’re feeling a little nervous. To truly look bright, you must engage your eyes. Think of a genuine moment of laughter or a favourite memory; this small mental shift softens the forehead and creates a warmth that a camera lens captures instantly.
Practising in front of a mirror is not about vanity; it’s about muscle memory. Spend a few minutes finding your natural resting smile. You’ll likely discover that a “half-smile” often looks more authentic on camera than a full-toothed grin. If you’re ready to see the difference professional expertise makes, you can view our school portrait gallery to see how we help students find their best expressions.
Overcoming Photo Day Nerves
Nerves are the biggest enemy of a natural expression. If you feel your face tightening, try a simple breathing technique: inhale for four seconds, hold for four, and exhale for four. This resets the nervous system and relaxes the muscles around your mouth. Building a quick rapport with your Festival City photographer also helps; our team is trained to make students feel at ease through friendly conversation. If you happen to blink or feel you’ve missed the mark, don’t be afraid to ask for a quick retake. We want you to be proud of the final result.
Smiling for Different Ages
The approach to smiling changes as students grow. For Kindy and Primary students, we often encourage genuine giggles to capture that fleeting, youthful spark. High schoolers, however, might prefer a more controlled “soft smile” or a confident toothy grin depending on their personal style. If you have braces, don’t hide them. Smiling with confidence regardless of metal is part of your school journey. A confident, braced smile always looks better than a tight-lipped expression that appears uncomfortable or shy.
Why Professional Quality Matters for Your School Memories
While your personal preparation is vital, the final image relies heavily on technical precision. Even if you follow every tip on how to look good in school photos, the technical execution by the photographer makes the ultimate difference. Professional studio lighting is designed to wrap around the subject, softening shadows and highlighting the details of your uniform and expression. Unlike a quick smartphone snapshot, professional lenses provide a depth of field that ensures you remain the sharp focus of the portrait. Choosing an experienced school photography Adelaide service means recognising that these portraits are more than just pictures; they are a community investment built on decades of trust.
Class group photos serve as a historical record of your school journey. They capture the friendships and the collective spirit of your year level in 2026. Physical prints offer a tangible legacy that won’t disappear if a hard drive fails, providing a permanent place on the family mantelpiece. However, the modern family also requires flexibility, which is where high-quality digital options become essential for sharing and archiving.
The Value of Digital Image Files
Digital assets have changed how we share memories. Using digital image files for school photos for social media and family sharing allows you to instantly send portraits to family interstate or overseas. These files are high-resolution, meaning they can be archived from Kindy through to Year 12 without losing quality over time. They also allow for custom large-format prints if you decide to create a special display later. It’s a convenient way to ensure your child’s growth is documented in a format that fits into a digital lifestyle.
Milestone Portraits
Specific events require a more specialised technical approach than a standard portrait session. Celebrating the final year with graduation portraits Adelaide ensures that this significant transition is documented with the gravity it deserves. Formal photos use different lighting setups to account for gowns and caps, ensuring every detail is sharp and clear. By maintaining a consistent quality through the years, families can create a cohesive gallery that tells a story of achievement. Knowing how to look good in school photos is the first step, but trusting a professional ensures those efforts are preserved for decades to come.
Capturing Your Best Self in 2026
A great school portrait is much more than a lucky snapshot. It’s the result of thoughtful preparation, from getting a good night’s sleep to mastering the “chin out and down” technique. By focusing on your posture and using the tongue-behind-teeth trick for a natural smile, you can step in front of the camera with complete confidence. Mastering how to look good in school photos allows you to relax and let your personality shine through, ensuring a result that you and your family will cherish for years to come.
At Festival City Photography, we’ve been an Adelaide family-owned and operated institution since 1990. With over 30 years of experience, we combine technical precision with a friendly approach to make every student feel at ease. We offer rapid turnaround for both digital and physical orders, making it easier than ever to share your milestones. View our school photography packages and reorder online to preserve your school memories with professional quality. We look forward to seeing your confident smile in the 2026 school year.
Frequently Asked Questions
What should I wear for school photo day if we don’t have a strict uniform?
Choose solid, mid-tone colours like navy, forest green, or burgundy as they look best under studio lights. Avoid large logos or busy patterns that distract from your face. A smart-casual approach, like a collared shirt or a neat knit, works well for non-uniform days in Adelaide schools. Ensuring your clothes are well-pressed is a vital part of how to look good in school photos when you aren’t wearing a blazer.
Can I wear my glasses for school photos, or will there be a glare?
You should definitely wear your glasses if you wear them every day. Our professional lighting setups are specifically designed to minimise reflections and glare on the lenses. Our photographers might suggest a tiny tilt of the head or a slight adjustment to the frames to ensure your eyes remain the clear focus of the portrait. It’s much better to look like your usual self than to squint without your spectacles.
How can I hide a pimple or blemish on the day of the shoot?
The most important rule is to avoid picking or squeezing a blemish, as this creates redness that is harder to mask. Professional studio lighting is surprisingly forgiving and often softens the appearance of minor skin imperfections naturally. If you’re particularly worried, remember that our high-resolution digital image files and prints capture your best side, and we use technical precision to ensure every student feels confident in their final portrait result.
What is the best hairstyle for a school photo?
The best hairstyle is one that keeps your hair out of your eyes and off your face. This allows the camera to capture your full expression and ensures the lighting hits your features correctly. Avoid trying a brand-new style on the morning of the shoot. Instead, stick to a neat, familiar look that you’ve practiced. Using a small amount of product can help manage flyaways that often show up under bright studio lights.
How do I get my toddler to sit still for their kindy photos?
The secret to successful kindy photos is keeping the atmosphere light and pressure-free. We recommend avoiding phrases like “sit still” or “behave,” which can make a toddler feel tensed. Our Adelaide photographers are experts at engaging young children with toys or gentle jokes to find that genuine, fleeting smile. Let them wear their favourite school jumper or hair ribbon so they feel comfortable and ready to play along with the camera.
Should I smile with my teeth showing or keep my mouth closed?
There is no right or wrong way to smile, so choose the one that feels most natural to you. Some students prefer a confident, toothy grin, while others feel more comfortable with a relaxed, closed-mouth expression. If you’re unsure how to look good in school photos, try the tongue-behind-teeth trick to keep your facial muscles soft. The goal is to look approachable and bright rather than forced or stiff.
What happens if I don’t like my school photo?
If you’re unhappy with your portrait, check with your school’s administration to see if a scheduled retake day is available. While our 2026 equipment and lighting are designed to produce excellent results first time, we understand that sometimes a blink or a stray hair happens. We aim for every Adelaide family to be proud of their photos, so we work closely with schools to ensure the best possible outcome for every student.
How do I order extra prints or digital copies of past school photos?
You can easily order extra physical prints or high-resolution digital image files directly through the Festival City Photography website. We maintain an extensive archive of past school and sports portraits, allowing families to fill gaps in their collection or replace lost items. Simply use your unique shoot key or contact our Adelaide office for assistance. This ensures your child’s entire school journey is preserved in a consistent, professional format.